TL;DR — A step-by-step tutorial for tracking Contact Form 7 submissions as Goals in Google Analytics using Google Tag Manager and the new CF7 DOM Events.
Following on from my post last year about tracking Goals in Google Analytics (GA) for Contact Form 7 (CF7) submissions, it’s time to share an updated tutorial for using CF7’s new DOM events to trigger our goals via Google Tag Manager (GTM).
Why? Two reasons:-
- I deploy GA via Google Tag Manager now and you should too.
- The authors of CF7 recently announced the deprecation of their beloved ‘on_sent_ok’ action hook, which most people are using to track their goals at the moment.
Prerequisite
In an attempt to streamline this article I’m going to assume that you already have Google Universal Analytics deployed via Tag Manager and that it’s all working fine. If not, Google’s own article is a good starting point. You also need to have version 4.7 of Contact Form 7 (or above), as the new DOM events we’re going to be using were added in this release.
I. Set-up your Goal in Google Analytics
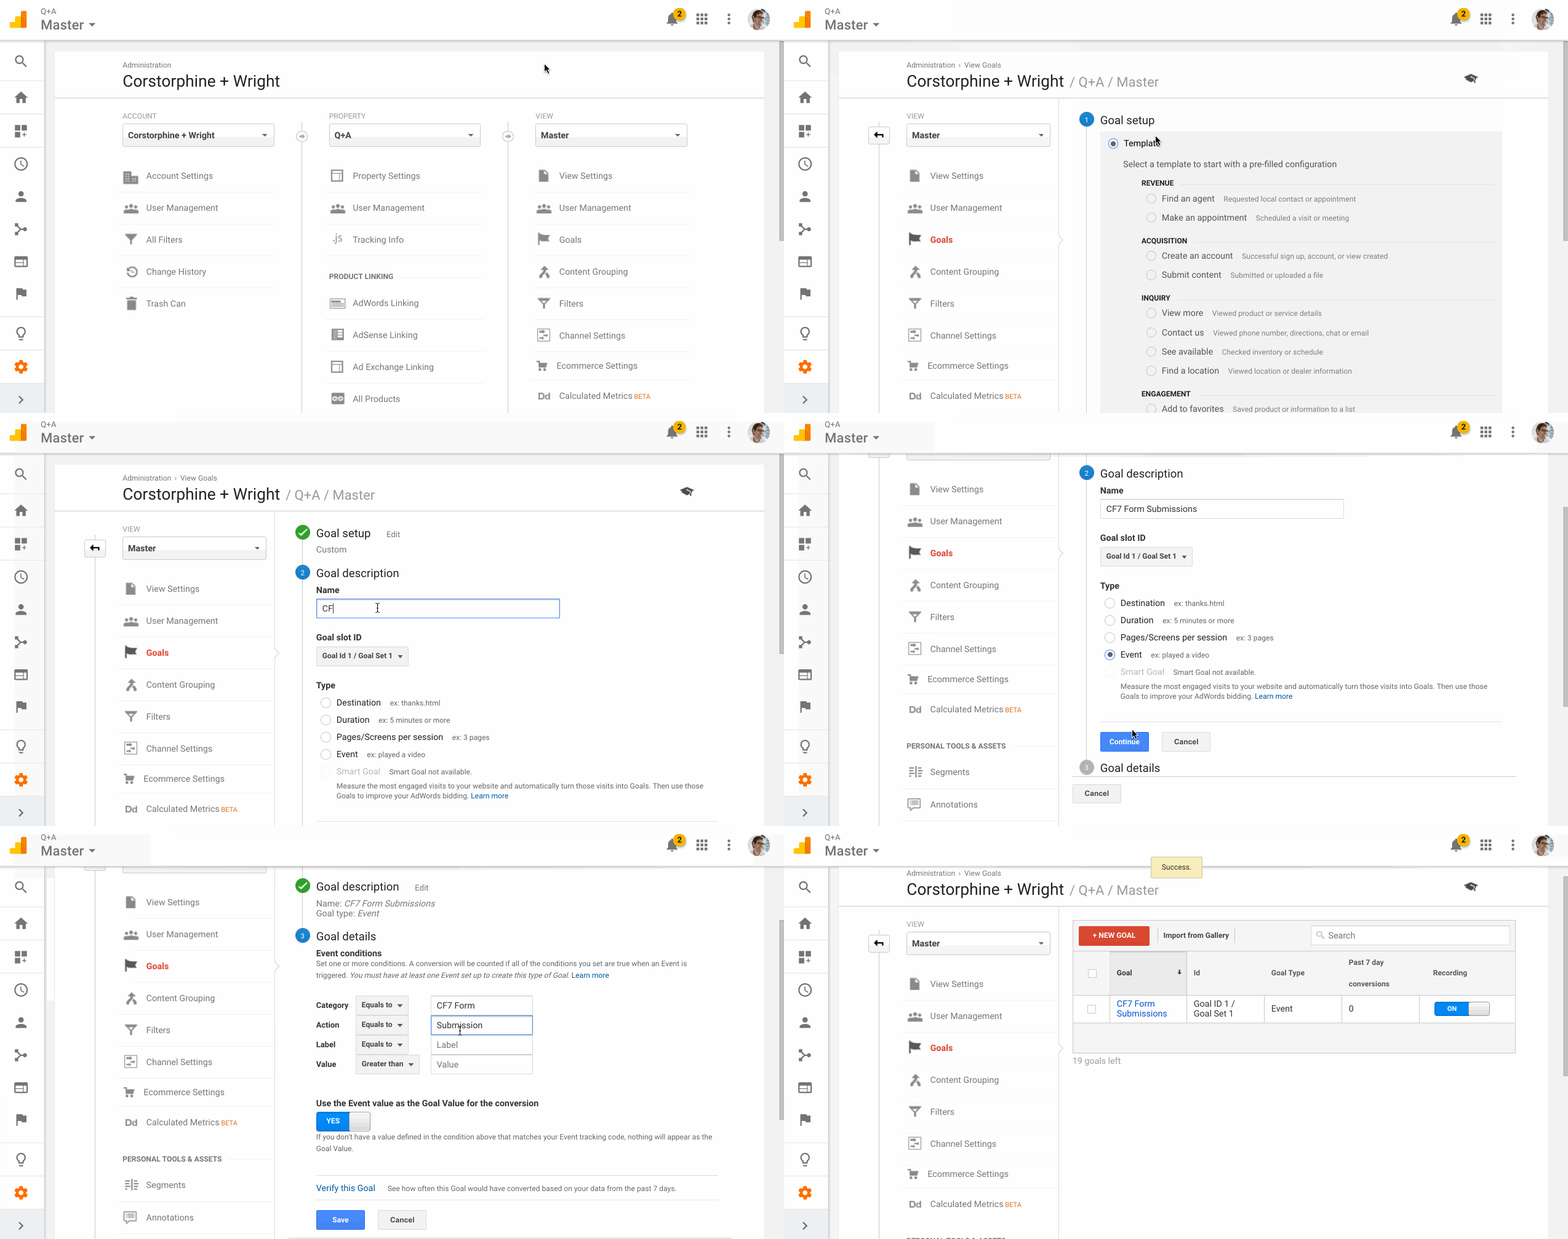
To begin setting up your Contact Form Goal, simply head to your desired GA View, click on the admin-cog in the bottom left and hit the +New goal button:
The goal that we’ve just set-up is now ready and waiting for us to send an Event that matches the custom Category and Action conditions we’ve defined.
II. CF7’s new DOM Events
In order to send this Event to GA via GTM to activate our new goal, we can utilise the new DOM events in CF7 that fire automatically in the following five scenarios:
- wpcf7invalid — fires when the user has submitted the form with errors, typically when not all mandatory fields are entered.
- wpcf7spam — if the submission has been identified as potential spam and the email hasn’t been sent.
- wpcf7mailfailed — if the form was correctly completed but the email wasn’t sent due to a failure.
- wpcf7submit — when the form has been completed successfully, irrespective of other incidents.
- wpcf7mailsent — when the form has been completed successfully and the email has been sent.
Because we wish record instances of the form being successfully completed without error, we’re going to use the wpcf7mailsent event to trigger our event.
It’s worth noting the other four DOM events may be useful to track as events if you’re analysing your forms for Conversion Rate Optimisation.
Because these DOM Events occur automatically in the background since version 4.7 of CF7, we don’t have to modify anything further in the plugin, it’s all over to Google Tag Manager (GTM) now.
I should also point out, that if you were previously using the on_sent_ok Action Hook within the additional settings, and you’re upgrading to this method, don’t forget to remove these settings within that tab.
III. Implementing an Event Handler
In order to fish-out and do something with the chosen DOM Event when it fires, you can set-up a simple JavaScript Event Handler within a Custom HTML Tag in GTM.
https://gist.github.com/bavington/97cdde74f28f1c86244de794a2f172e9#file-cf7_event_handler-js
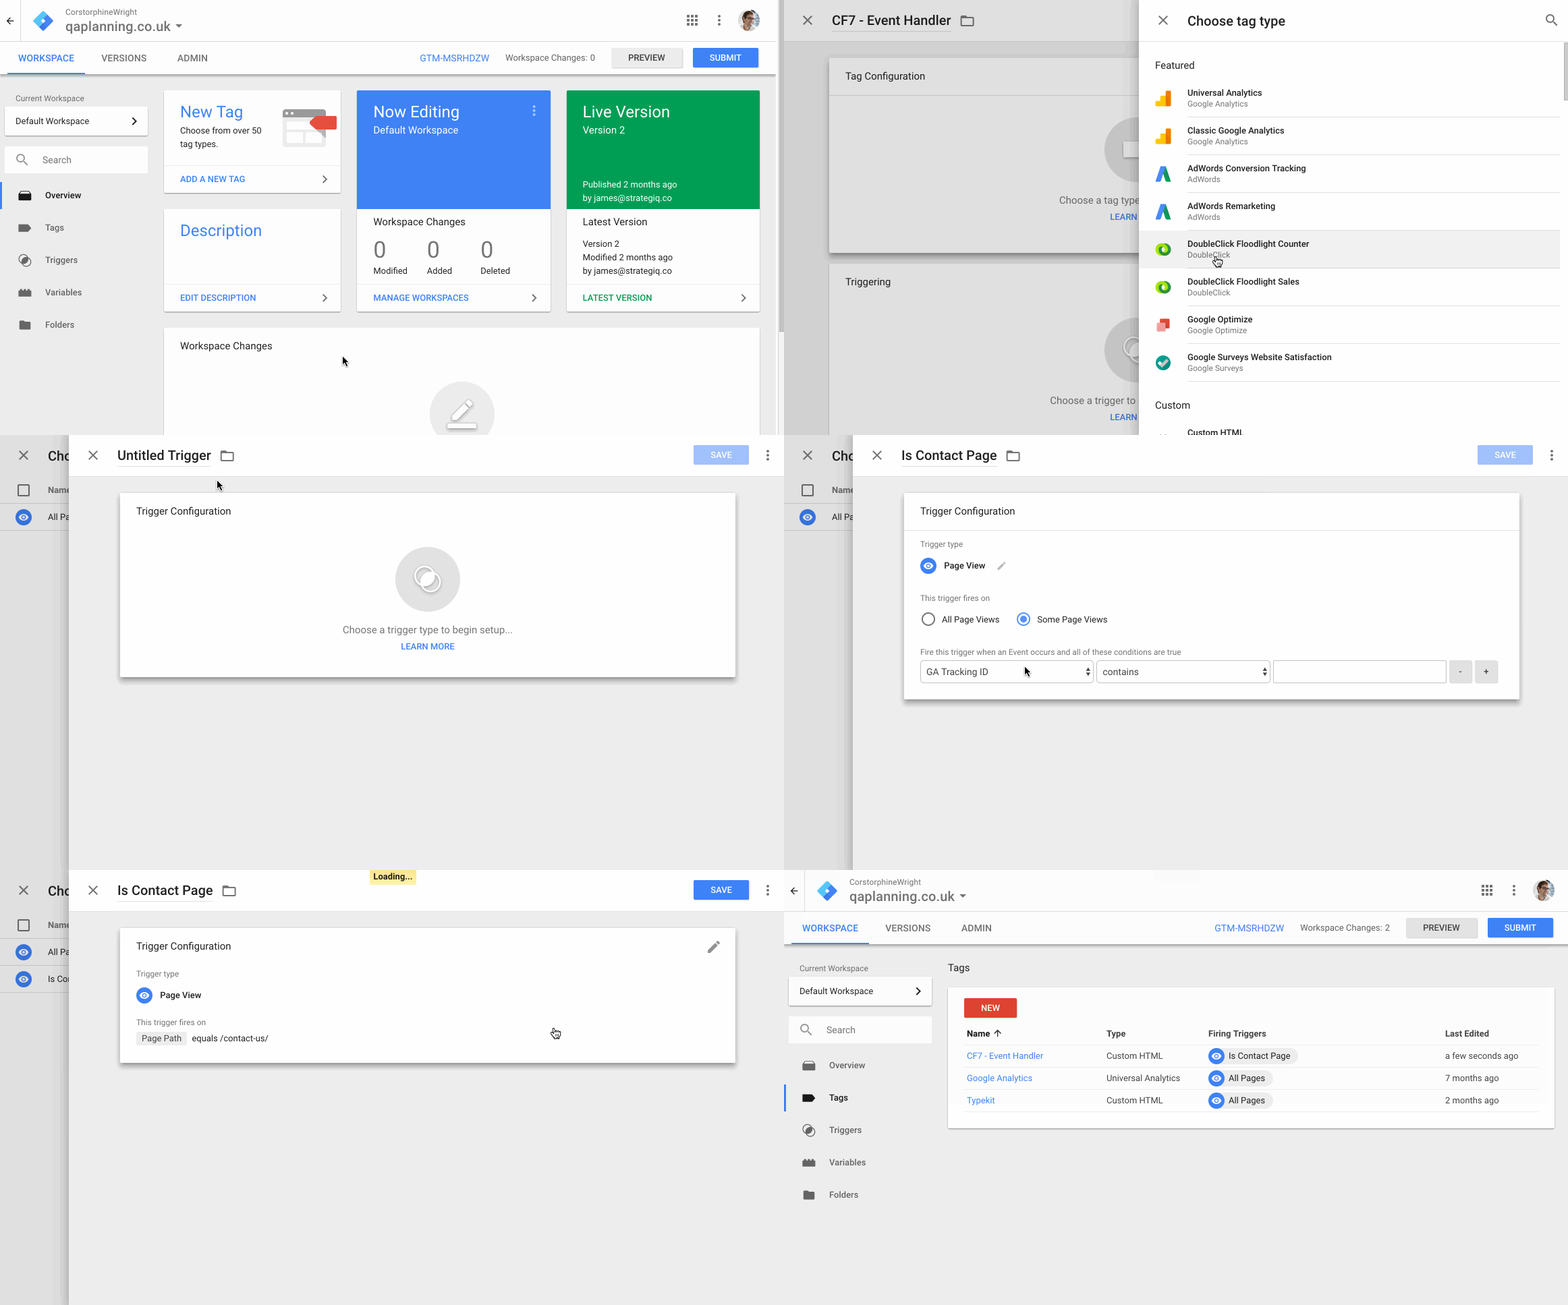
Before we use our Listener to push the Event onto GA, try implementing the above JavaScript alert first in GTM, to check that your Event Handler is working as follows:
Once you’ve created your Custom HTML Tag, you’ll notice in the animation above, I’ve limited the trigger to only fire on the contact page itself, which is the only place where my form is. If your form is site-wide you can choose to use the default ‘All Pages’ trigger.
IV. Testing the Event Handler
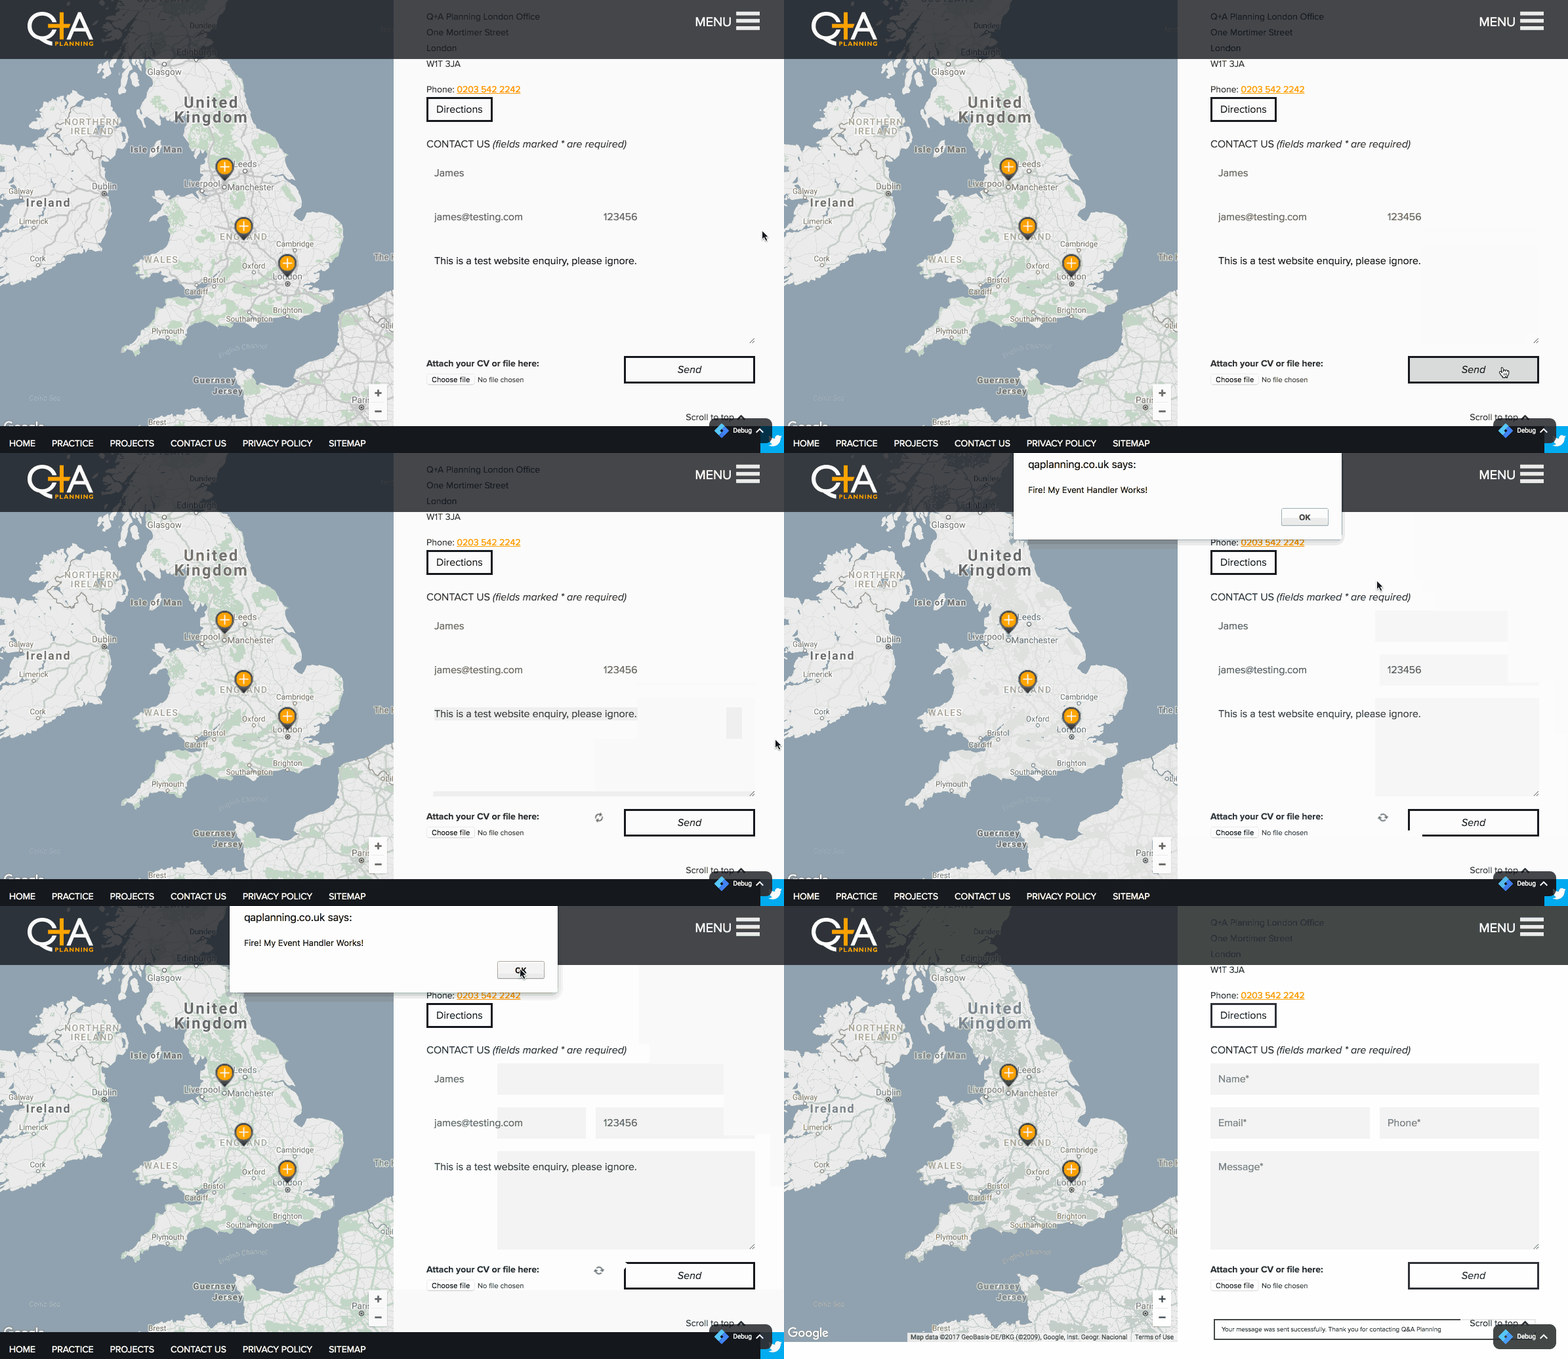
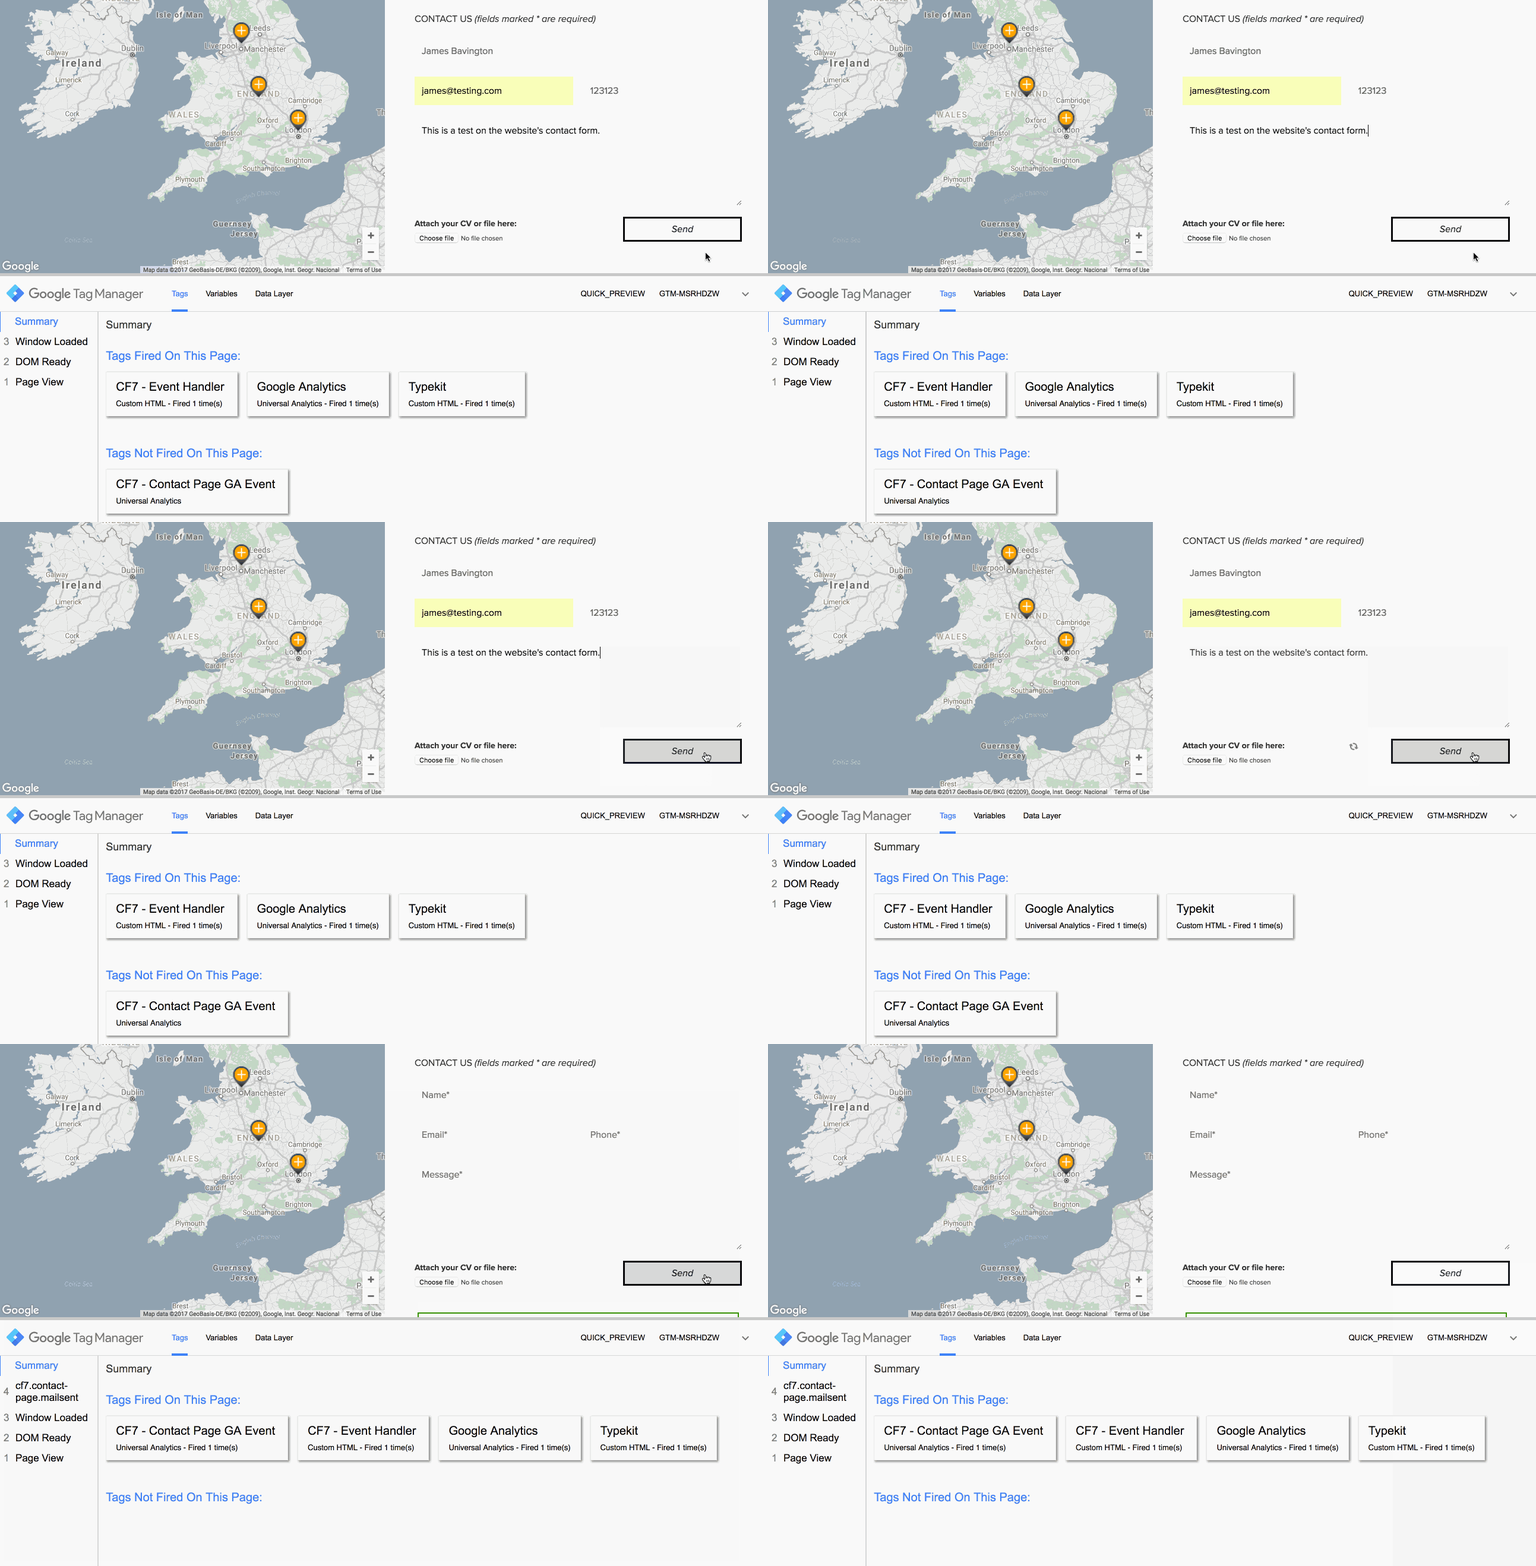
Now that your Custom HTML Tag and trigger are in place, you can test that your Event Handler is working within GTM’s preview mode, or publish to live. Like in the GIF below, navigate to your form and complete a submission.
You should see the JavaScript alert appear only, when you successfully complete the contact form. Pretty cool right!
V. Push the event into the Data Layer
Next we’re going to use this Event Handler to push a completely new GTM Event into the GTM Data Layer.
Let’s call our new GTM Event: cf7.contact-page.mailsent
Now go back to your Custom HTML Tag for the Event Handler, and modify the function on line 3 so that we can push our new Event into the Data Layer:
https://gist.github.com/bavington/4761a4e3fdd2e4cc667f2c38f7477b92#file-cf7_event_handler_gtm-js
In summary, we now have a custom JavaScript Event Handler that we’re deploying onto our Contact Page via Google Tag Manager. Whenever our CF7 form is successfully completed, our Event Handler is pushing a new event called cf7.contact-page.mailsent into the GTM Data Layer.
VI. Triggering the GA Event within GTM
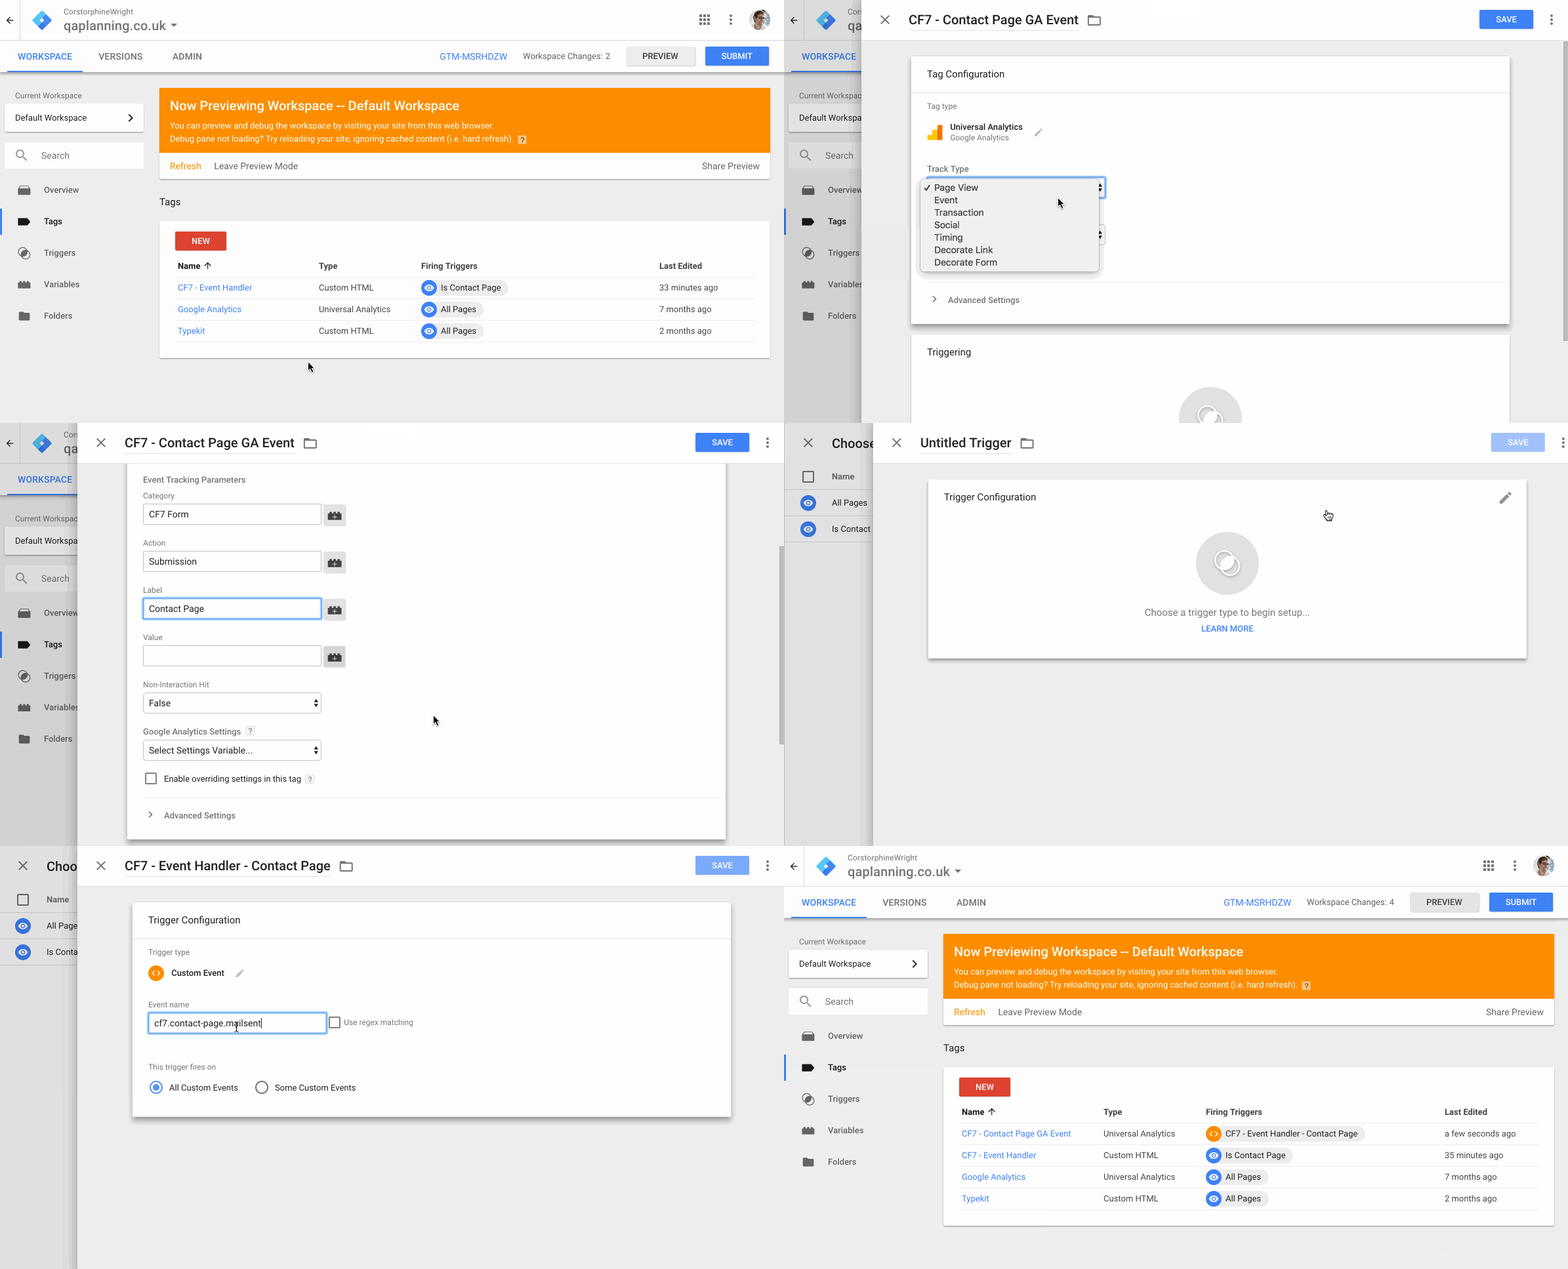
We can now use this Data Layer Event to trigger an actual Google Analytics Event within GTM that in-turn will ping our Goal that we set up in part 1.
To do this, start by creating a new Tag within GTM:
VII. Testing your configuration
The easiest way to test if your Event is registering within Google Analytics, is to view your contact page in GTM’s Preview mode, and you should see:
- Your Event Handler Custom HTML fire when the page loads
- Your GA Event Tag fire when the form is successfully completed
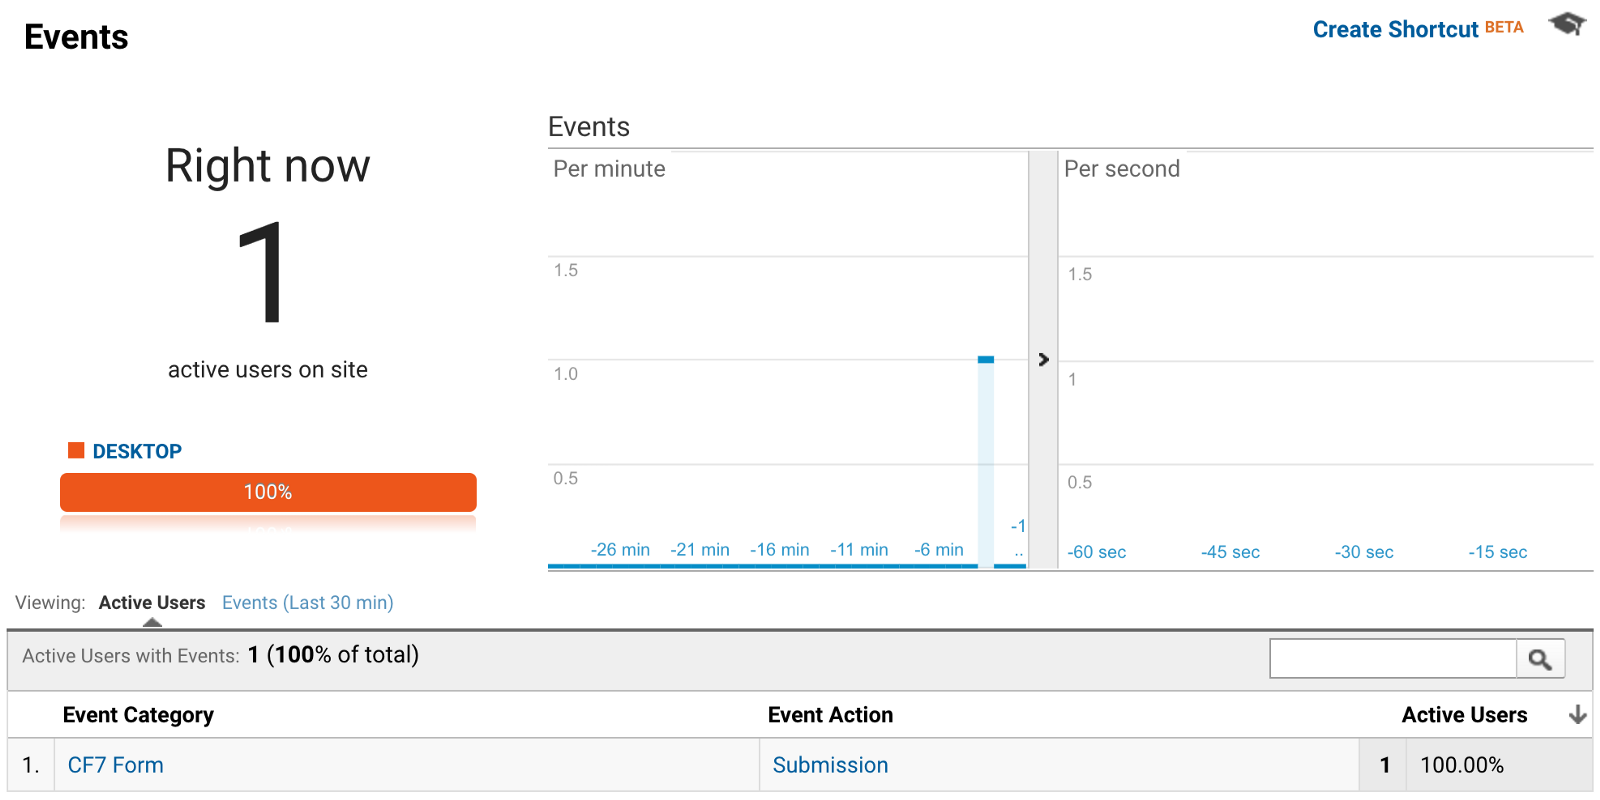
You can also then head over to Google Analytics, and navigate to the ‘Realtime’ reports and click on the Event’s tab. Here you should see your event firing within the Realtime chart:
Providing that your Event Category and Action values match those you defined in your Goal, you should be able to check back on your Conversion reports to see your goals triggering.
Conclusion
Setting up GA Goal Tracking for Contact Form 7 using the new DOM Events and Google Tag Manager might seem a cumbersome and daunting prospect; but it’s a scalable and solid process for marketers without needing to modify the source code of the website.
Please let me know your thoughts and feedback on the article, I’m no doubt going to refine the article over the coming days, so do let me know if you have any tips for making it even better.
James.
