I’ve been promising this one for a while now, it’s finally here! Using these custom dashboards, you can quickly and easily find keyword cannibalisation in Google using your Search Console data.
Keyword cannibalisation can cause real issues for organic performance and can potentially eat away at your own, or your client’s, visibility. Sometimes it can be challenging enough to rank a specific page, without inadvertently creating a false economy whereby you’re competing against yourself.
If you’re finding that getting the data you need to stay on top of keyword cannibalisation is difficult, or taking too much time, here’s a really simple dashboard to give you what you need.
By using Google Data Studio, this overcomes the 1000 row export limitation in Search Console and returns all instances of keyword cannibalisation.
This is not intended to be a guide on how to fix cannibalisation issues but rather to give you the tools you need to identify and analyse quickly, getting the bigger picture in the process.
The Data Studio dashboard is the explorer where you can pivot between query and URL, exporting just those of concern. The Google Sheets version is fuelled by the raw export from Data Studio and returns a list of potentials identified. Choose whichever is better for the task at hand!
It goes without saying that this is not a definitive list of issues, it simply identifies potential cannibalisation for you to start your analysis based on signposts from the available data. From our internal use, it’s worked really well!
By seeing the bigger picture and areas of tension, you can more effectively prioritise and address any concerns.
Whilst this tool identifies existing issues, the Data Studio report also works great as an on-going monitor to help capture those which slip past or outside the scope of your daily ranking reports. Resolving keyword cannibalisation should not be an annual housekeeping task and proactively monitored as best as possible.
These tools give us visibility over all instances of cannibalisation for our clients in Google search.
Note – April/May 2019: With all the Google indexing issues experienced over the last 4 weeks, there is even more reservation towards search console data over this period. Consider this if your date range would be affected!
So what do I mean by Cannibalisation?
In search marketing, cannibalisation is when two or more pages compete for the same search term.
Cannibalisation can play out in a number of ways. At times it can become apparent more easily with noticeable flux and tugs in your rankings and other times less so as they interchange seamlessly. Don’t be fooled by a straight line!
Even with attentive and daily rank checks, cannibalisation may not be apparent or recorded. Almost all rank trackers run a daily check – a mere second of 86,400 in a day – a lot can happen in between.
To look back at our hourly rank tracking experiment, the flux is eye-opening and this is from just 24 checks a day! Find out more about our hourly rank tracking here.
For anyone who hasn’t seen it before, this is what hourly rank tracking looks like. Anything sub page one is really, really choppy! #SEO pic.twitter.com/xtuSl4Kfab
— Chris Green (@chrisgreen87) 2 March 2017
How to find Cannibalisation quickly and easily
Using Google Search Console data, this tool shortlists all queries with more than one landing page. This offers a simple method to find cannibalisation quickly and easily.
Just choose your preferred method of review below and connect to your search console data:
1. Using the Cannibalisation Explorer in Data Studio
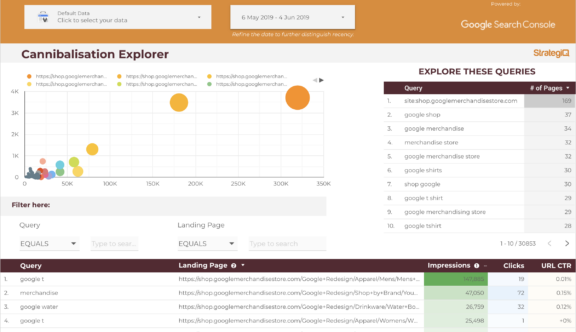
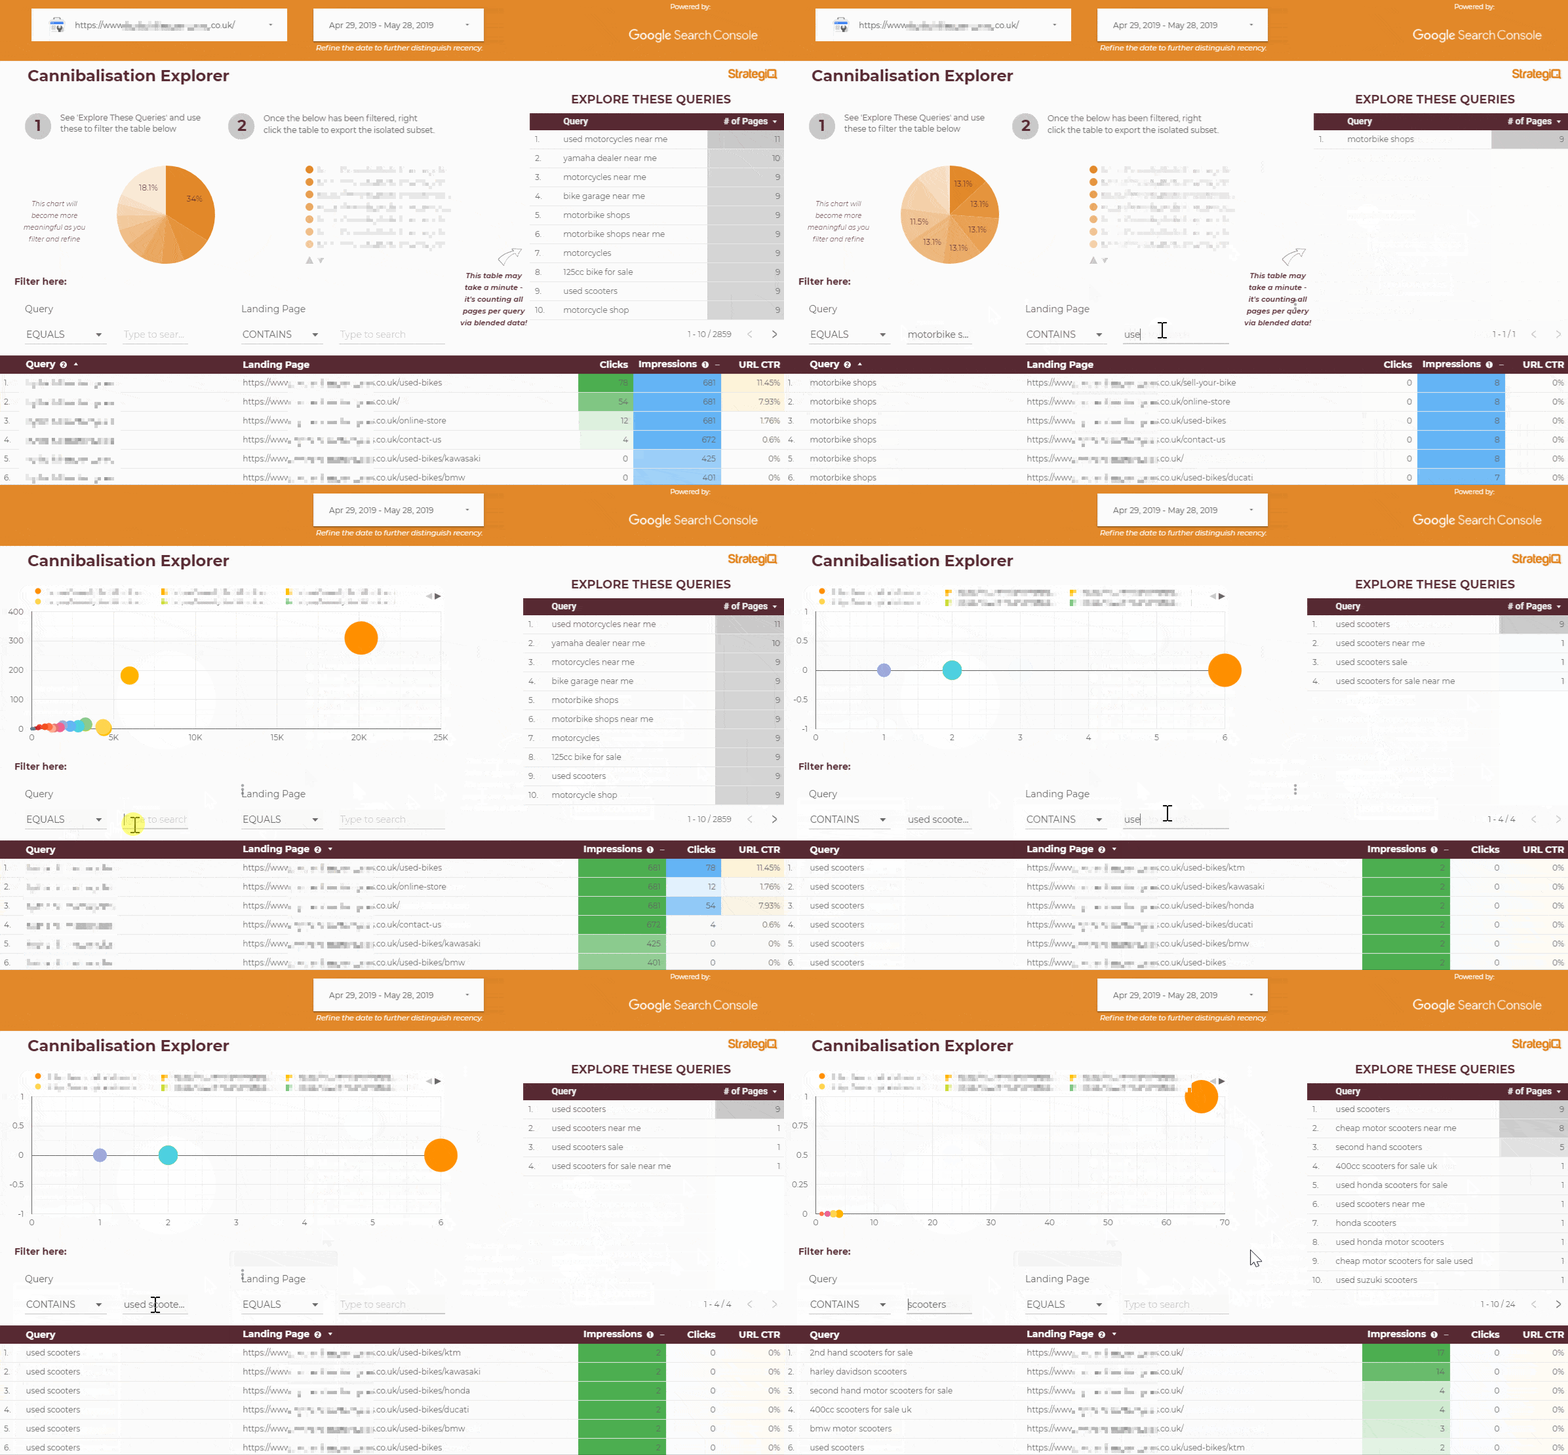
If you want to explore cannibalisation, use the ‘ Cannibalisation Explorer’ in Google Data Studio. The query and URL filters combined with a shortlist make this easy to use and discover. When you find a concern, right click the table to export.
2. Using the Cannibalisation List in Sheets
If you prefer to have a list to work through, you’ll also need the Google Sheet – ‘Cannibalisation: List’. Simply export all (no filters needed) from Data Studio and paste into Sheets for analysis.
Caution! Some instances of cannibalisation are URLs switching out and other times both competing in the same result at the same time – it’s important to understand the situation at play when reviewing your data.
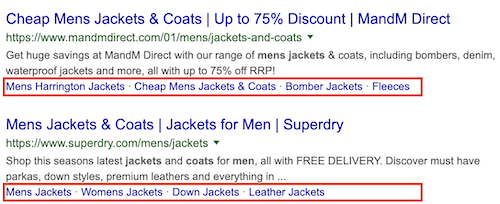
Keep in mind that when two URLs are impressed in the same search, this will rightfully show an impression for both. 1 search but 1 impression to each URL. You could easily look at equal number of impressions across two URLs and assume this is being ‘switched out’ for one another but it may be a dual listing. Equally, sitelinks can also skew impressions! Whilst these used to affect brand searches these are now also seen across non-brand too:
All of this data is merely signposts for you to explore, investigate your SERPs and identify the problem but at least you know where to start and can prioritise with a full (and filtered) view!
How it works
Cannibalisation Explorer (Data Studio) – [Jump to Setup]
The right table returns your shortlist and the main table gives you more information.
Once you have added your brand terms to the filter, simply triple-click to select a query from the shortlist and filter the main table to see the data. Page 2 features a bubble chart which is my preferred view as here you can see a visual distribution of impressions and clicks rather than just impression % across pages.
With filters for queries and URLs you can explore back and forth between both dimensions. This is helpful to explore as its likely not a single query that’s affected.
If you’re concerned and feel it’s an area to address, you can right click and export the data before moving on to the next.
Tip: You can easily combine multiple CSV exports using terminal or command line, alternatively use an online CSV combine tool.
Cannibalisation: List (optional Google Sheet) – [Jump to Setup]
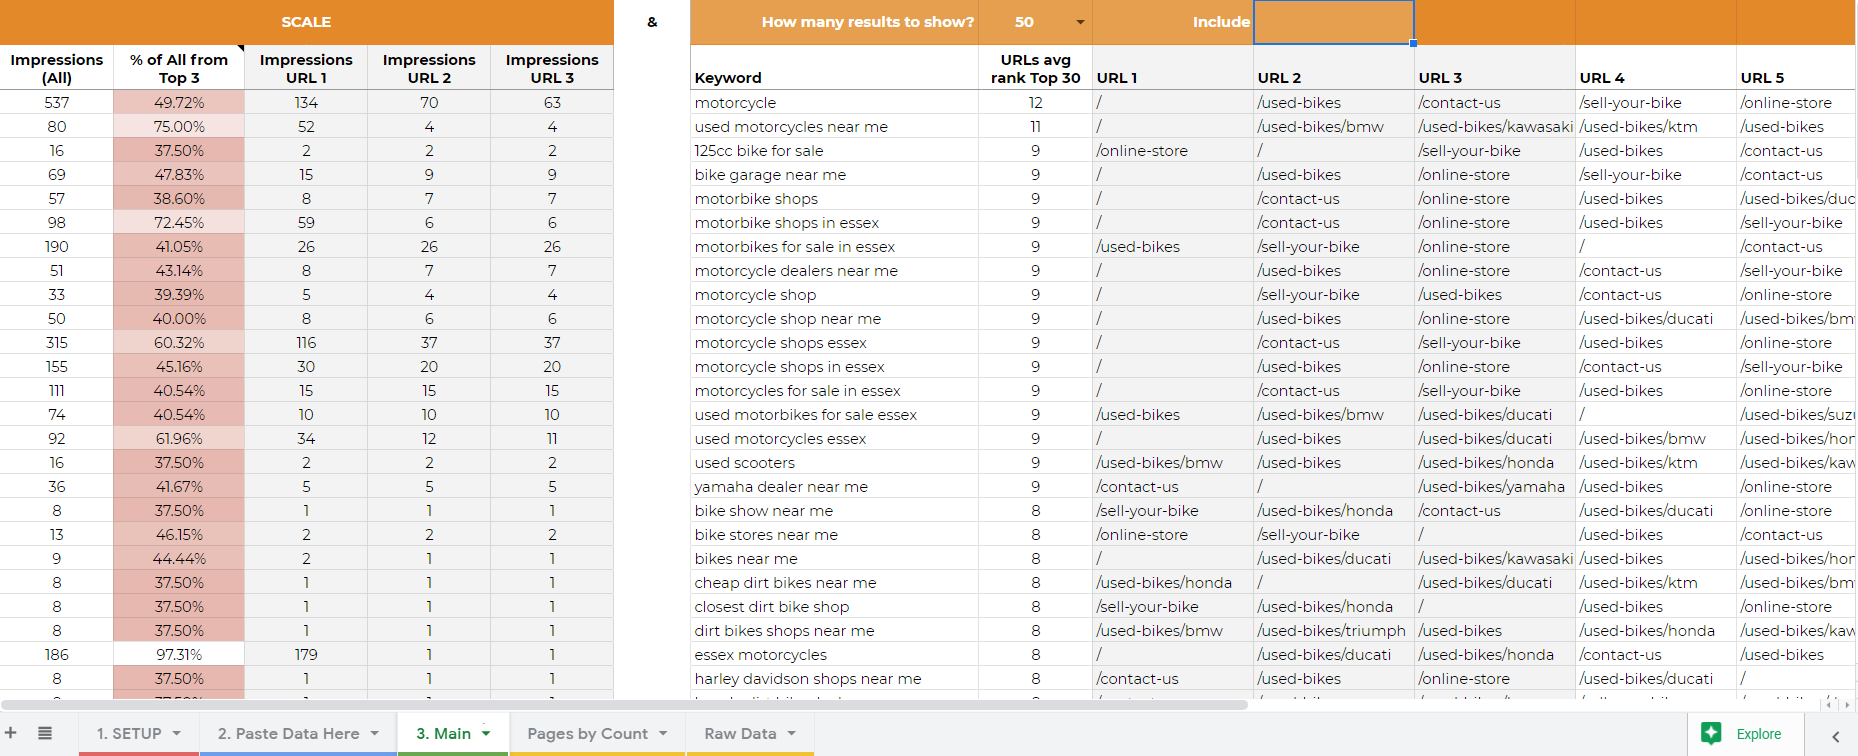
This Google Sheet compliments the explorer and uses the full export from Data Studio. You’ll see something like this:
In the setup tab, you set the following:
- URL
- Brand terms to exclude
- URL count threshold (Search Console) or ranking threshold (Supermetrics)
- How many rows to analyse
- Do you want to see impression data distribution?
You’ll find the output on the main tab, along with another tab of all pages by count of landing page. The main tab includes:
- Overall impressions
- The top 10 URLs in desc order of impressions
- If enabled, impression distribution across the top 3 URLs, plus top 3 comparative to the whole.
Essentially, the lower the percentage the bigger the issue. Again, this is merely to help signpost to the worst cases or on the flip verse, to tackle some of the tighter quarters. - Ability to change the number of results shown
- Filter to include / match a keyword
Note: Slow but powerful, helpful to isolate for larger sites but consider using the Data Studio version if regular filtering is needed
There is also an optional custom save function in the menu which will copy the values of the main tab into a new tab, preserving formulas and saving the need to recalculate when you re-open. This is a custom script and will cause a permission popup but in case this is your first time doing this, don’t be alarmed by the permissions granted – this does not give us access to your account or any of your data.
Setup
1. Cannibalisation Explorer (Data Studio)
https://datastudio.google.com/s/qB1xZIulCjE
- Make a copy of the report
- Edit brand filter via Resource > Manage filters > Edit, adding brand terms separated by a pipe. e.g. strategiq|strategic
- View report and then select website
Thats it! You’re ready to explore.
2. Cannibalisation: List (Google Sheet)
https://bit.ly/CannibalisationTool
The progress bar will guide you through the setup but try to be patient in the last step if you’re pasting a lot of data – there is a lot going on here!
- Make a copy of the sheet
- Follow the steps on tab ‘1. Setup’
- Paste data from above Data Studio report into tab ‘2. Paste data here’
Go to tab ‘3. Main’ to see the output, changing the number of results as needed.
Just using sheets? With combined use in mind, the Sheet has been built around the export from Data Studio. So if you plan to use the sheet alone, the quickest way to get the data you need is still to export the unfiltered table from the corresponding Data Studio report.
To get this simply select your domain in the Data Studio report, right click the main table and export all – voila! Otherwise, you’ll need to match up the column headers and create an import to mirror the current layout. You don’t need to set a brand filter in this instance as the Sheet will handle that!
Thats it – get stuck in! Hope it proves as beneficial to you as it has to us.
Even better if…
If you are working on a large e-commerce site, bringing analytics data in alongside metrics such as revenue and conversion could be really helpful. You can pull this in alongside the data in Data Studio or use a vlookup in Sheets to lookup the values for the matching timeframe.
I have a few ideas for an e-commerce centric version which would include revenue data but also some potential integrations such as stock status or categories from Magento. This would help to priortise large inventories of products when it’s become difficult to know all of the stock and where to start.
What’s Next?
Supermetrics connector
There is also a Supermetrics version of this tool which uses average rank. Whilst this compliments the data, it’s not powering the shortlist process but this does enrich the Google Sheet by allowing a rank threshold if needed. This is especially helpful for larger sites and e-commerce.
I’ll release this next week once I have had a chance to fully package and make shareable!
If you don’t currently use the Supermetrics connector for DataStudio, you’re still able to connect and use the tool for 14 days.
Stay in touch by following us on Twitter @StrategiQ.


